
Rules Focus: Flareborn Reavers


After introducing Prince Kaelith, the second Kazyr Essence Weaver, it's now time to take a look at the additional units joining the faction with its first wave of releases. And we're starting with the Flareborn Reavers.
Like their Skirmisher counterparts, the Flareborn Reavers are elite Kazyr warriors who rely on positioning and well-timed attacks. But while the Skirmishers excel at getting into the thick of things and slipping away again, the Reavers prefer to keep their enemies at a distance.
Armed with Embersteel Shards, they can threaten approaching enemies, make movement a dangerous proposition and even summon a spinning manifestation of death to punish models caught in the wrong place. In short, the Reavers are a unit that wants to make your opponent think very carefully about where to move next.

Move at your own risk
Let's start with one of their defining abilities: Defensive Fire. Whenever an enemy model ends a move within range of a Reaver's ranged weapon, that Reaver may immediately make a ranged attack against the approaching enemy. And here's where things get interesting. The Reavers' Embersteel Shards have Beam 6" (B6). Rather than targeting just a single model, a Beam attack uses a range widget measuring 6" long and 1" wide, potentially hitting every model underneath it.
That means a single Reaver can threaten multiple enemies with one well-placed shot. And with three models in the unit, that's quite a bit of potential firepower. Importantly, Defensive Fire doesn't require the enemy to move towards the Reavers. Simply ending a move within their weapon range can be enough to trigger an attack. This opens up some interesting tactical possibilities. Place your Reavers near an objective, and your opponent may have to risk incoming fire to contest it. Position them to cover an important route, and advancing through that area suddenly becomes considerably less appealing.
And because a Beam can hit multiple models, your opponent needs to think about more than just the model triggering Defensive Fire. Other models caught underneath the widget may find themselves in the line of fire as well. Of course, clever positioning can help your opponent avoid lining up multiple targets. But forcing them to spread out or reconsider their approach is already valuable. Sometimes the threat of an attack can be almost as useful as the attack itself. Especially when that attack can hit half the enemy unit.
And now you're easier to hit
Getting shot while moving is annoying enough. But the Reavers can make that experience even worse. Crippling Shot allows them to apply the Crippled condition to an enemy model they hit with a ranged attack, at the cost of one red Essence. That makes it a natural combination with Defensive Fire.
An enemy model moves into range, the Reavers open fire, and a successful hit can leave the target considerably more vulnerable to subsequent attacks. And with Beam attacks potentially hitting multiple models, the Reavers have opportunities to weaken enemies while threatening an entire formation. Rather than simply dealing damage, they can create openings for the rest of your army. And because Defensive Fire can trigger outside their own activation, they can influence the battlefield even when it's your opponent's turn to act.
There is a resource consideration, however. Combining Defensive Fire with Crippling Shot costs two red Essence. That's a considerable investment, so you'll need to decide whether weakening a particular enemy is worth it. Against the right target, it absolutely might be.
A little something for everyone
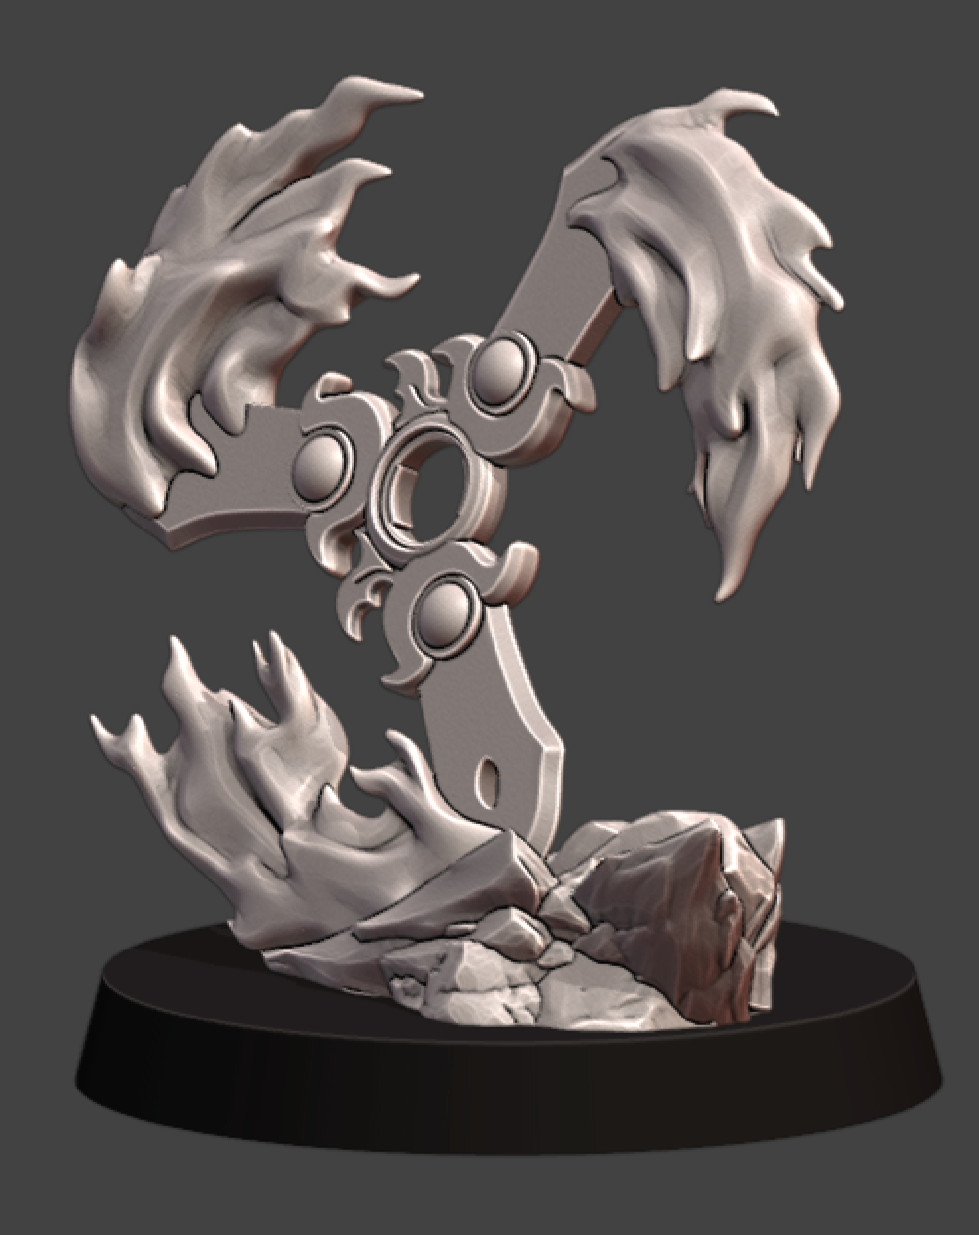
Of course, sometimes shooting individual enemies isn't enough. Sometimes you want to threaten an entire area. That's where Spinning Emberstar comes in. For one red Essence, the Reavers can place a 32 mm Emberstar manifestation within 6" of their unit. Unlike Serelleth's Ashfire Storm, which creates a persistent area of dangerous terrain, the Emberstar is all about setting up a threat for the end of the game round.
Before the manifestation is removed, you may push it 2". Then every model within 2" of its final position suffers a ranged damage roll of three yellow dice and one grey die. That gives your opponent something else to worry about. Do they move away from the manifestation and potentially abandon a useful position? Or do they simply accept the risk and hope the damage won't be too severe?
The ability to push the Emberstar before it detonates makes it particularly interesting. An opponent who thinks they're standing just outside its area of effect might be in for an unpleasant surprise.
But of course there's counterplay, too. A clever opponent can block the path along which the manifestation could be pushed, potentially limiting its impact significantly.
A Cinder well spent
As with the other Kazyr units we've introduced, the Reavers have their own way of consuming Cinders for a powerful short-term benefit. Cinder Mark allows the unit to remove a friendly Cinder within 2". In return, its models gain Accurate Shot (1) and Giant Slayer until the end of their activation. That's quite a combination.
Accurate Shot helps the Reavers make their ranged attacks more reliable and increases their chances of landing critical hits, while Giant Slayer makes them particularly interesting against larger enemy models. Combined with their Beam attacks, these bonuses can make a well-positioned unit of Reavers particularly dangerous.
But as always with the Kazyr, there is a decision to make. Do you keep the Cinder in play to benefit from your Essence Weaver's Leadership, or consume it to make the Reavers' attacks more effective? Sometimes the passive benefits of a Cinder are too valuable to give up. At other times, removing a particularly dangerous enemy model is worth sacrificing that advantage. Especially when that enemy happens to be considerably larger than your Reavers.
Getting close won't save you
With all those ranged attacks flying around, your opponent might think that engaging the Reavers in melee is the obvious solution. Unfortunately for them, the Reavers have Pistolero.
This allows them to use their ranged weapons even while engaged in melee, including firing at the enemies they're fighting themselves. So getting up close doesn't necessarily mean escaping those Embersteel Shards.
And there's another nasty surprise waiting. Critical: Wounded prevents enemies hit by a critical attack from removing damage until the end of the game round. That's particularly unpleasant for models relying on healing to stay in the fight. Combined with Crippling Shot, the Reavers can make life difficult for enemies in more ways than simply dealing damage. They can weaken defensive profiles, prevent healing and continue shooting even when engaged in melee. While their greatest strength lies in controlling engagements from a distance, they're far from helpless when an enemy finally reaches them.
Controlling the battlefield
The Flareborn Reavers introduce another interesting dimension to the Kazyr army.
Where the Flareborn Skirmishers use mobility to choose their fights, the Reavers use ranged threats to influence where those fights can happen in the first place.
Defensive Fire punishes enemies for moving into their weapon range, and their Beam 6" attacks mean that punishment can extend to several models at once. Crippling Shot weakens enemy defences, while Spinning Emberstar threatens clustered models and forces difficult positioning decisions. And Cinder Mark gives the Reavers the option to consume a Cinder when they really need their attacks to count. Together, these abilities make the Reavers a unit that can influence your opponent's decisions even when they aren't actively attacking.
Place them where their Beam attacks cover important approaches. Use Spinning Emberstar to threaten objectives or clustered enemies. And keep an eye out for opportunities to use Cinder Mark against particularly valuable targets. Because with the Flareborn Reavers, it's not always about dealing the most damage. Sometimes it's about making sure your opponent doesn't get to do what they wanted in the first place.


